Welcome back! Today I want to share my process for designing our salvaged fireplace mantel at The Shack. You’ll remember last time we discussed the puny original mantel and the reasoning involved in the new design.

Here you can see my scribbled sketch specifying our new fireplace mantel at The Shack. The plan involves raising the existing painted shelf up, after creating a new layered surround. Then building up the surround with brackets, using the piano legs and other pieces of reclaimed wood. Finally, we’ll build the ‘overmantel’, using the antique piano panel and more wood surrounding it.
As you can see, a lot of planning goes into projects like these. The proportions and measurements of each piece has to be considered, along with the method of attaching them to the wall and each other.
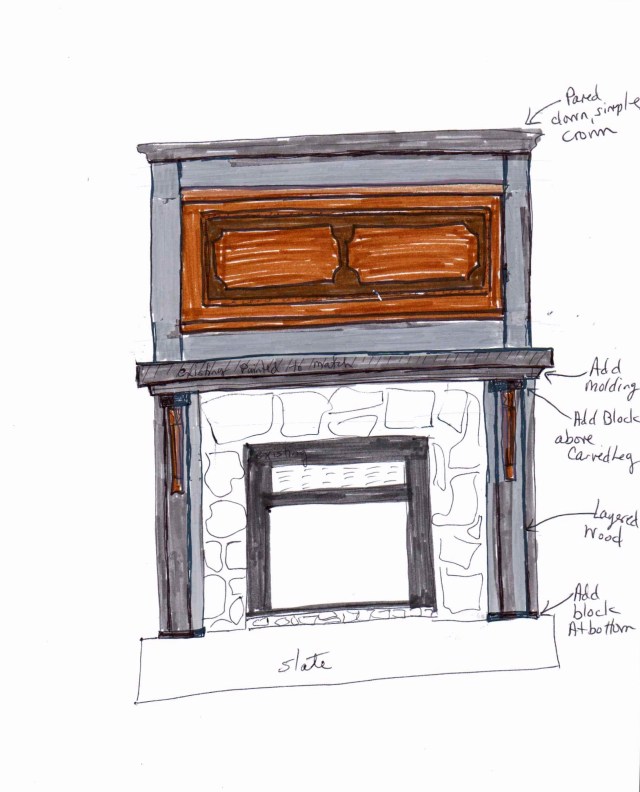
I also made this little preliminary sketch, to show my husband carpenter, just what I was talking about.

Even the overmantel was meticulously laid out and planned, before we began assembling the reclaimed fireplace mantel at The Shack.
Finally, we began the process of building the entire thing!

The first step in building out the reclaimed mantel is to frame out the stone area with a first layer of painted new wood as a base for the reclaimed oak pieces.

Next we replaced the existing mantel shelf board atop the new frame. Raising the shelf up, really helped with the proportions of the overall mantel.

Now we could start adding the beautiful antique oak pieces. We build up two smaller plinths at the bottom, before installing the tall oak board, to give it a base or foot, if you will.
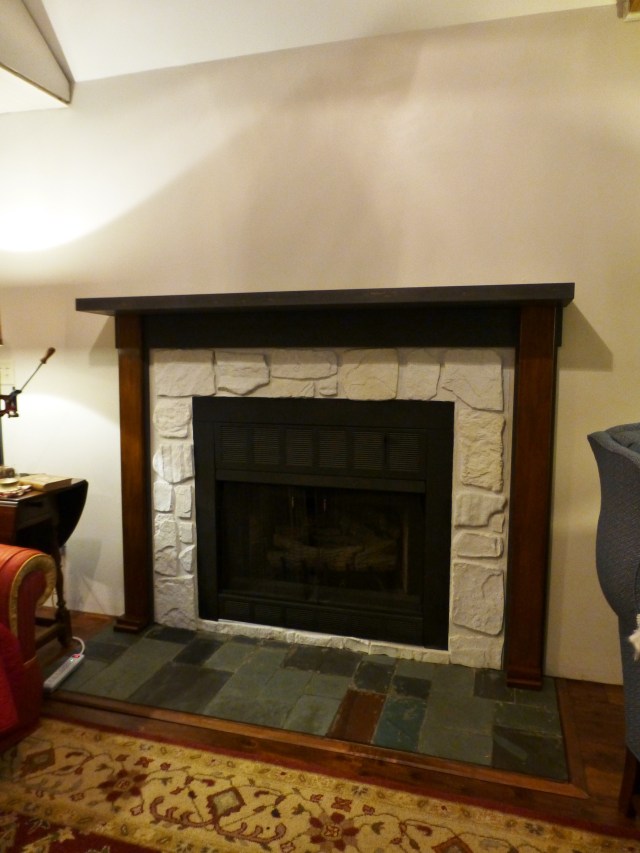
Once both sides were completed, we can think about adding on the decorative brackets at both sides, and another piece of oak will run across the middle underneath the shelf and in between the two legs.
Finally! In this photo you can see most of the base is complete. We decided to take a breath at this point, and live with the mantel as-is for a bit. It already looks soooo much better, don’t you think? I’m loving the new proportions and the vintage elements. They add so much rustic charm. But I can;t wait until we get that top portion done. I think the overmantel will be a real show-stopper!
Join me again next time, for the final faze of our custom mantel build-out. Stay tuned for further updates about The Shack. I’m planning to share the details of our custom fireplace mantel with you soon. Until then, make sure to like Robinson Interiors on Facebook, Instagram, Pinterest, and Twitter, and DO stay tuned for future updates on The Shack!
Click on this image to be taken directly to my website for more information on Robinson Interiors.

