Things have wrapped up in my Bucks County Designer House bedroom…unfortunately I was rather badly delayed in my progress just before the designer house opened. This was caused by construction in the bathroom. The dirty work had to be completed before I could install the furniture, window treatments, artwork, and accessories. That was so distressing, since I was very eager to get things finished and installed. So much planning goes into these spaces, it’s frustrating when things don’t go according to schedule!
Some things I’d been working on, all along, were small accessory items. I painted a few occasional pieces in a Benjamin Moore pearl finish, which will look terrific with the shimmery Stout Textiles fabric I used on the custom window treatments and bedhangings.
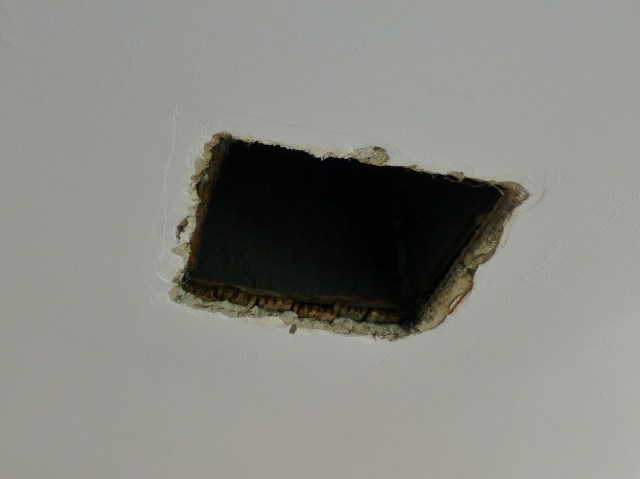
One of those items I spent some time working on is the ugly louvered vent, which was centered on the ceiling in my 2016 Bucks County Designer House bedroom. Do you remember seeing it in the before pictures?

Here’s the lovely industrial HVAC vent in the middle of the low ceiling at the 2016 Bucks County Designer House bedroom I designed this spring.
This is just one of the many challenges I faced when designing the space.
This vent was one of the first things my eye went to when I first visited the ‘before’ space at the designer house. It stood out like a sore thumb in the low-ceilinged bedroom. So, I brainstormed for quite awhile, with how to treat such an eyesore. The extremely low ceiling was only 80″ high! Plus there are no light fixtures anywhere in the room, which gave this vent added importance. And yes, the vent is live, providing much needed hot and cool air to the space seasonally, so it needed to stay.
Eventually, the idea came to me that many old homes have lovely decorative iron grates for the forced air heating, with beautiful scrolled patterns and other decorative designs. If I could find something similar that was the correct size, I might be able to fashion a makeshift cover which wasn’t so dismally utilitarian!
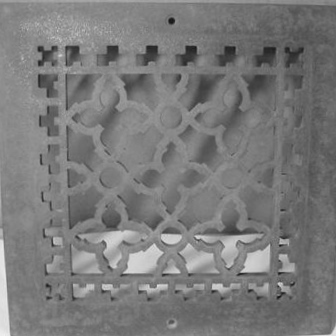
After some searching, I found this reproduction iron grate, cast from a Victorian original, which fit the size I was looking for. It was raw and unpainted, so that saved me the step of having to strip or sand down the paint from an older, vintage example.
The grate is 10″ x 10″, which is pretty close to the existing louvered vent which was 13.5″ x 13.5″ at the widest point.
I decided the best way to mount the vent to the ceiling and make up the size difference between the new and old vent, was to frame it with something pretty. So I went in search of a vintage feeling (and affordable) picture frame that would look nice but also be sturdy enough to hold the weight of the relatively heavy iron grate.

This pretty gold, rose-embossed frame was on sale at pictureframes.com and I liked the Art Deco/glammy feel it had. The gold finish is a bit bold for the center of the ceiling, so I decided I could modify that, once I had it in hand.
I went ahead and ordered the frame to fit the metal grate, and the size came out just perfectly!!
When we took down the old vent, to screw on the freshly painted and assembled ceiling grate, we found that the old plaster and lath in the ceiling was totally rotted out in this historic portion of the home. None of the screws would bite, even into fresh areas around the perimeter of the opening. What to do?!
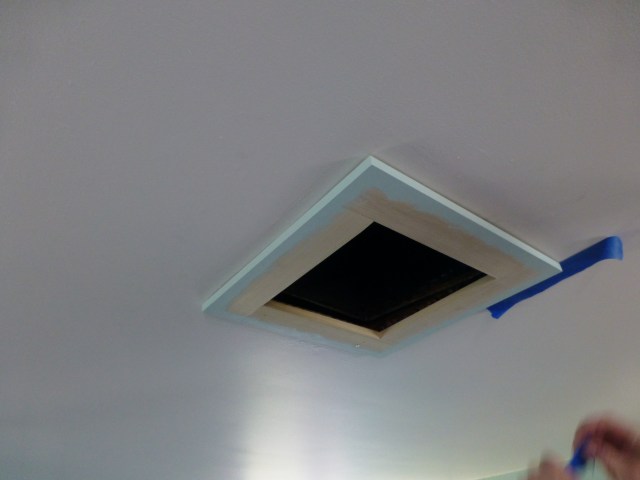
I’m so fortunate I have the most wonderful handy husband. So I called on him (at the last minute, of course) to quickly build a wooden frame, which we could install on the ceiling. This would give us a larger and more sturdy area for the vent to be mounted upon and screwed into. I opted to paint wood frame in the historic Colonial Williamsburg Benjamin Moore wall color, Galt Blue. This is the same soft color I had painted on the walls and trim of the bedroom. Having this little bit of color contrast would allow the frame to stand out a bit and create a layered detail, once the frame and iron vent were installed on the ceiling.
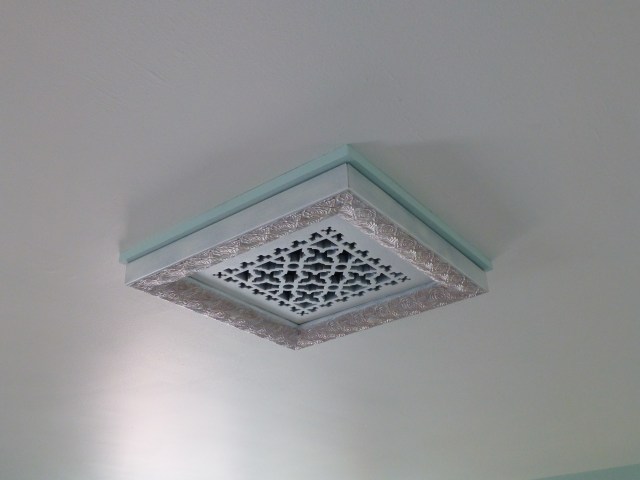
And finally, here you see the finished vent. The iron grate got a coat of the white ceiling paint, while the gold frame got painted and glazed with pearl finish, having just a tiny bit of the gold peeking through. Finally the wood frame is painted Galt Blue and just barely sticks out from beneath the pearl and gold frame. I absolutely love the feminine feel of the layered vent design, don’t you? Now, instead of an embarrassing eyesore, the vent is a centerpiece and something I wouldn’t mind looking up at, while lying in bed.
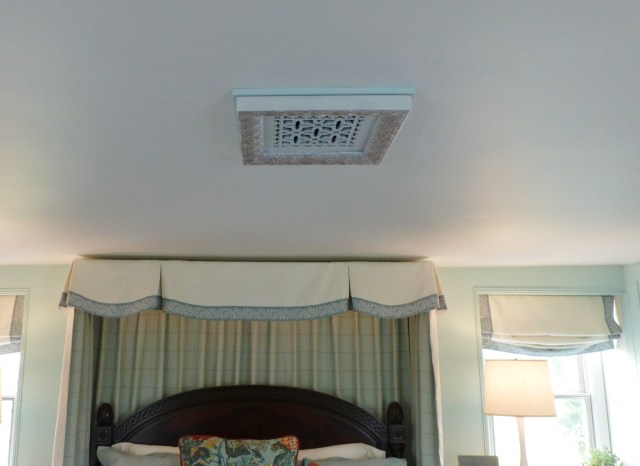
Here’s a sneak peek at the relationship between the vent and the bed…doesn’t the custom drapery work look fabulous in the room?! As you can see in this image, the HVAC vent is prominently placed in the center of the room, so it absolutely could not be ignored. I love the way it turned out and am certain all that time (and money) spent was definitely worth the extra effort. Details like these can make all the difference in a room’s design, don’t you think?
I promise I’ll share beautiful professional photographs of this completed bedroom soon…I’ve got some exciting things in the works right now, including a published article in a national design industry publication! That’s why I’ve been saving the final shots of this gorgeous space until after the article is published this fall. Thanks for sticking with me through the process of this Bucks County Designer House bedroom…planning and implementing the design of this room has been a fun journey and I’ve been so happy to have you following along with me!
Stay tuned for the ‘after’ images of this space, and I’m going to start sharing a new project with you soon. Until then, feel free to share my posts and images with your friends on Pinterest, Facebook, Twitter and other social media. I absolutely adore making new friends!

Click on this image to be taken directly to my website for more information on Robinson Interiors.


Hi Kristine, Love what you did with the vent. Sheila
________________________________
Thanks, Sheila!! You’re always so nice to post a comment. This was a tricky spot in the room!