Welcome back! Today I want to share with you my plans for a custom wall mural in my 2016 Bucks County Designer House bedroom. I keep reminding you about the wall opposite the room’s entrance in this historic home, because it’s such a focal point in the space and confronts you as soon as you enter the bedroom. Unfortunately it is cluttered up with several doors and a little step-back alcove.

Here’s the BEFORE view upon entering my bedroom at the Bucks County Designer House.
As you can see, the room was in quite a state when I first found it!
The wall opposite the entrance has an attic door (on the left), a cedar closet under the stair, then a small nook of wall space and another shallow closet on the right.
So, as I shared with you in my last post, I’ve opted to paint all the walls and trim the same identical color and finish to eliminate some of the visual clutter. If you missed it, you can read about that here: http://wp.me/pEVbo-Ri
I know I want to use the small amount of wall space in the tiny L-shaped nook for a small desk/vanity with a mirror. Of course, since this wall is directly across from the door and is the very first thing visitors will see upon approaching the bedroom, I wanted to try and create a dynamic focal point here as well.
I toyed with using wallpaper on a few areas to add interest and texture, but the home hosting this year’s designer house has already been purchased by a young family, and the future residents have requested that wallpaper not be used. They’re afraid that wallpaper removal might create extra work for themselves after the designer house ends. I even went so far as to make a special request and showed them the wallpaper I wanted to use on just 2 walls, but still, they weren’t open to the idea at all. So I went back to the drawing board and continued to think about my options for this interesting little space, ruminating on how I could make the most of it.

Prep work has begun on my 2016 Bucks County Designer House bedroom. As you can see, the doors and walls will all be painted in this lovely Seafoam blue.
The alcove, straight ahead in the center of this image, is the wall in need of a focal point.
It dawned on me that a wall mural (either hand-painted or digitally printed) could be just the thing! I’ve seen some amazing rooms with overscaled floral murals on Pinterest recently, and they gave me the inspiration I needed.

This overscaled floral artwork was one of the inspirational images I found on Pinterest (click through to be taken to the original image). I love how the hugely enlarged botanical lends a modern feel to this cottage.

Here’s another inspiration image I found on Pinterest, using an overscaled watercolor floral for a mural. This one is really pretty too, and I like how blurry and soft the watercolor looks in this one. Very romantic and feminine but updated and modern too!

And, of course, this Anthropologie ‘Rosella’ Mural is absolutely stunning. Clicking on this photo will take you to the Anthropologie website and their page of gorgeous wall murals. I love the styling of their home décor line, don’t you?
I did a little sketch (as I often do), to help me visualize how a large floral image would look on that little bit of wall space, and I really liked how it turned out! Sometimes drawing it out, really makes the project seem more real.

My sketch of the focal wall with a custom overscaled floral mural in my 2016 Bucks County Designer House bedroom.
So, after going through this whole process in my head, I contacted my friends at Limitless Walls, and they agreed to sponsor my room, by providing a custom mural to fit this nook. I was absolutely floored with their generosity! You should definitely check out their website: https://www.limitlesswalls.com/
Next, the search began for the perfect watercolor floral image I could use as a starting point. Shawn, from Limitless Walls, came up with several suggestions based on the inspiration images I emailed. The help Shawn provided was fantastic! The process began with finding a hi-resolution image I liked, and once we narrowed that down, Shawn and I were able to fully customize the colors, in order to more closely match the floral fabric I’m using as pillows in the space.

This is the original coloration of the watercolor floral image that I selected to use in my designer house bedroom. I thought it would be the perfect ‘exploded floral’ to use in my Bucks County Designer House Bedroom, but the colors were just not quite right.
I definitely did not want the yellow-green or the fuchsia pink/purpleish color in my mural, and the background was also just a bit too green.
I wanted to get the colors very close to the floral fabric from Stout Textiles, which I am planning to use on pillows and accents throughout the space.
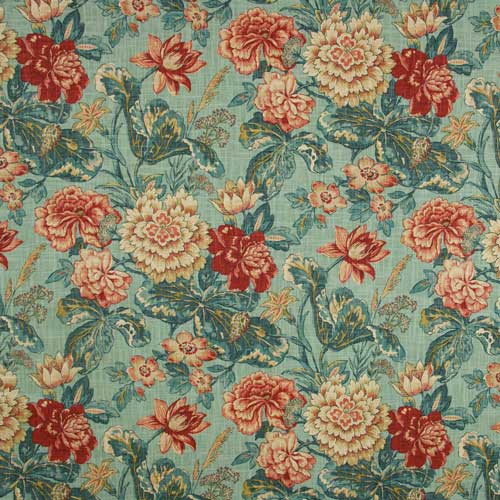
This gorgeous floral from Stout Textiles has all the colors I’ll be using in my Bucks County Designer House bedroom. While only used on accent pillows, it’s the glue that ties the whole room together!
So, Shawn and I went through about 4 color changes, fine tuning the image until I was absolutely thrilled with the result.

Here’s the final coloring for my custom floral mural, by Limitless Walls, being used in the 2016 Bucks County Designer House bedroom I’m designing.
The black line indicates where the corner will turn in the actual nook, and the image is to scale as it will be applied to the alcove wall from floor to ceiling.

Here’s an image with my sketch of the wall, the fabric sample from Stout Textiles and the final version of my custom wall mural by Limitless Walls. Isn’t it just perfect?!!
Finally, after all the back and forth (Shawn was very patient with me!) Limitless Walls mailed me an actual small printed proof of the design, so I could be absolutely sure the colors would be an exact match with my paint colors and fabric. It was great to be able to see how the mural would look and feel in real life, after seeing it take shape on my computer screen. The quality of the thick fabric on which the image is printed feels terrific. It’s thick and luxurious and I know it will apply to the wall very easily. Limitless Murals has two unique fabric materials made to suit your design preferences, Standard Fabric and Premium Canvas. Both are self-adhesive (no additional paste or adhesive required), totally removable, and completely reusable. Both fabrics have a matte finish. The murals have a peel-off backing, which you remove when you’re ready to apply it to the wall. My mural is wider than standard, so it will have a seam, which I’m confident will hide beautifully within the pattern, just like wallpaper.
Once I approved the sample proof, Shawn had the large mural shipped right off to me in a long skinny box–it was all wrapped up in brown paper and packaged in a water-tight plastic bag. It just arrived the other day, so now I just have to wait for the designer house bedroom walls to be prepped, painted (by my fabulous painter, Michael Howard from The Perfect Hangup) and cured (Limitless Walls recommends 2 weeks) before applying this beautiful floor-to-ceiling mural in the bedroom’s small alcove. I’m absolutely positive it will create just the eye-catching focal point I was looking for on this wall!
I hope you enjoyed seeing the process for designing this amazing custom feature of my 2016 Bucks County Designer House bedroom. It’s so much fun designing unique, custom elements like this one! If you’re thinking of a similar custom mural project in your home, you should definitely check out the Limitless Walls website. Their team of experts can make a mural out of your own photographs, or help you find an image that fits your vision, just like they did for me. https://www.limitlesswalls.com/
I’m really looking forward to sharing more of my progress on the renovations, so stay tuned for so much more about this exciting project!
Until then, feel free to share my posts and images with your friends on Pinterest, Facebook, Twitter and other social media. I absolutely adore making new friends!
Click on this image to be taken directly to my website for more information on Robinson Interiors.


You know I can’t wait to see this one finished! Love it!